
The PowerSyncPro Automated Installation Script enables rapid deployment of a fully functional PowerSyncPro instance — ready to synchronize directories and migrate workstations.
While the script handles most dependencies and certificate installation steps automatically, it’s important to review the PowerSyncPro system requirements in our documentation to ensure your environment meets performance and scaling needs. This includes database requirements. By default the script will build a default SQL Express installation which is limited by database size, be sure to review the documentation or reach out to support to ensure that SQL Express will meet your needs.
If you are installing PowerSyncPro in Microsoft Azure, please review our deployable Marketplace Image:
Azure Marketplace PowerSyncPro Server
PowerSyncPro installation requires a publicly trusted SSL certificate so that remote migration agents will trust the PSP server. This can be handled using a provided certificate (as a PFX file) or by utilizing Let's Encrypt. Let’s Encrypt is a free, automated, and open certificate authority that provides trusted SSL/TLS certificates for securing web services.
You can download the scripts required for installation at our GitHub repository here:https://github.com/PowerSyncPro/MigrationAgent/tree/main/AutoInstall_Script
Prerequisites
Server requirements
- Windows Server 2019 or newer
- Administrator access
- Ability to run unsigned PowerShell scripts
- Internet connectivity for dependency downloads
- Port 443 must be open to the Internet so migration agents can reach the server.
- Port 80 must be open to the Internet if using a Let's Encrypt certificate.
Certificate requirements
Option 1 – Let’s Encrypt
- Public IP with ports 80 and 443 open
- DNS A-record pointing to the server's public IP (e.g., psp.company.com)
- Valid email address for certificate renewal notifications
Option 2 – Bring your own certificate (BYOC)
- PFX file containing your SSL certificate and private key
- Password for the PFX file
- DNS A-record pointing to your server’s public IP (e.g., psp.company.com)
- Port 443 must be open to the Internet so migration agents can reach the server.
Option 3 – Self-signed (not recommended)
- Hostname for the certificate (e.g., psp-internal.company.com)
- Self-signed certificates are not recommended. Some PowerSyncPro features depend on trust relationships between clients and the server.
- If using a self-signed certificate, you may need to deploy it to machines running PSP agents in the root certification authority.
Option 4 – Existing certificate
Use a certificate that is already installed on the server — no PFX file required. Requirements include:
- A certificate already installed in the server's certificate store (Local Machine → Personal), including its private key
- The certificate must be within its validity period and valid for Server Authentication (certificates that do not meet these requirements are filtered out of the selection list automatically)
- DNS A-record pointing to your server's public IP, matching a name on the certificate (e.g., psp.company.com)
- Port 443 must be open to the Internet so migration agents can reach the server
Key notes before you begin
- By default, PowerSyncPro installs as the Local System account.
- To use a different account, specify -PSPServiceUser and -PSPServicePassword when running the script.
- If using a different account, that account must have permission to access to the SQL database.
- If using a default SQL Express installation, the script will provide required permissions.
- SQL Server Express 2025 will be installed automatically unless an existing SQL Server instance is detected.
- If a locally installed SQL instance is detected, the script will prompt for information about it to complete the install.
- The script configures an IIS reverse proxy that restricts administrative access to localhost (127.0.0.1).
- Use the WebConfig_Editor.ps1 script to allow other IPs or subnets to access the admin interface.
Installation flags: Split installs, standalone reverse proxies & offline installations
As of August 2026, the installation script includes flags for advanced scenarios: split installations, standalone reverse proxies, offline / air-gapped installations, and custom backend ports. These flags are optional and should only be used in specific use cases.
Split installation
- -PreReqOnly
- Runs all functions of the script up to where it would kick off the MSI installation of PowerSyncPro. This includes installing all prerequisite software including IIS etc.
- When running in -PreReqOnly mode, the script will prompt for your intentions on SQL. You can choose a local SQL instance, install a new SQL Express instance, or choose to use an externally hosted SQL Server.
- -ReverseProxyOnly
- Runs all functions of the script after the installation of PowerSyncPro. This includes installing and configuring the IIS reverse proxy (IIS, URL Rewrite, and ARR are checked and installed automatically), hardening the server, and installing a selected certificate.
- The script reads the port PowerSyncPro is actually running on from its configuration, so an installation on a non-default port is detected automatically.
- Prompts which type of certificate you would like to install: LetsEncrypt, BYOC (PFX), Self Signed, or Existing. The new Existing option uses a certificate already installed on the server — no PFX file needed — and offers the certificate currently bound to port 443 as the default. Wildcard and multi-name (SAN) certificates are supported.
- -CompletionOnly and -IISOnly from earlier versions of the script continue to work as aliases for -ReverseProxyOnly.
Standalone reverse proxy (separate server)
- -PSPBackendUrl
- Used together with -ReverseProxyOnly to build a reverse proxy on its own server (for example in a DMZ) in front of a PowerSyncPro installed elsewhere:
.\PSP_AutoInstall.ps1 -ReverseProxyOnly -PSPBackendUrl https://psp.corp.local:5001
- Used together with -ReverseProxyOnly to build a reverse proxy on its own server (for example in a DMZ) in front of a PowerSyncPro installed elsewhere:
-
- In this configuration the PowerSyncPro admin site is locked down by default — only the agent endpoints are published through the proxy.
- -NoLockAdmin
- Optional, only meaningful with -PSPBackendUrl: keeps the admin site reachable from the proxy server itself instead of applying the default lockdown.
Offline / air-gapped installation
- -PrepareOffline
- Run on any internet-connected machine (a workstation is fine, and administrator rights are not required) to download every installation component into a bundle folder, protected by a SHA256 integrity manifest.
- Add -IncludeSSMS to also include SQL Server Management Studio in the bundle (a large, multi-gigabyte download).
- Example (internet-connected workstation):
.\PSP_AutoInstall.ps1 -PrepareOffline -OfflinePath C:\PSP_Offline -IncludeSSMS
- -InstallOffline
- Run on the air-gapped server after copying the bundle folder across. The bundle's integrity is verified before anything is installed, and no internet access is used at any point.
- LetsEncrypt is unavailable offline; the certificate menu offers BYOC (PFX), Self Signed, and Existing certificates.
- Example (air-gapped server, from an elevated PowerShell prompt):
.\PSP_AutoInstall.ps1 -InstallOffline -OfflinePath C:\PSP_Offline
- -OfflinePath
- The bundle folder location: the output folder for -PrepareOffline and the source folder for -InstallOffline. Defaults to .\PSP_Offline
Custom backend ports
- -KestrelHttpPort / -KestrelHttpsPort
- Override the backend ports PowerSyncPro is configured with during a full installation (defaults 5000 and 5001), for servers where those ports are already in use.
Installation flag examples
With these installation flags you can use the Automated Installation Script even where an externally hosted SQL instance, a Group Managed Service Account (gMSA), an air-gapped server, or a separate proxy server is involved:
- External SQL or gMSA: run the script in -PreReqOnly mode to install all prerequisite software, install PowerSyncPro manually via the MSI (pointing it to an external SQL instance or utilizing a gMSA), then run the script in -ReverseProxyOnly mode to complete the installation, including configuring the reverse proxy and installing certificates.
- gMSA Information: Setting up and Utilizing a Group Managed Service Account (gMSA)
- No internet access: run -PrepareOffline on an internet-connected machine, copy the bundle folder to the air-gapped server, then run -InstallOffline there.
- Separate reverse proxy: install PowerSyncPro on the application server, then run the script with -ReverseProxyOnly and -PSPBackendUrl on the proxy server.
Installation steps
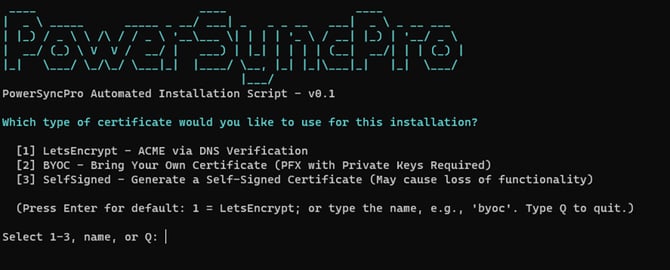
- Download PSP_AutoInstall.ps1 from the PowerSyncPro GitHub repository.
- Save the script in an accessible directory (e.g., C:\Temp).
- If using a PFX certificate, place the .pfx file in the same folder.
- Open PowerShell as Administrator and navigate to the script directory.
- If unsigned scripts are blocked, run:
Set-ExecutionPolicy Bypass
- If unsigned scripts are blocked, run:
- Execute the script: .\PSP_AutoInstall.ps1
- Optional parameters for a custom service account:
.\PSP_AutoInstall.ps1 -PSPServiceUser "DOMAIN\User" -PSPServicePassword "MySecurePassword123"
- Optional parameters for a custom service account:
- Let the script perform pre-checks (OS version, credentials, ports, SQL detection).
- Choose your certificate method (Let’s Encrypt, BYOC, or Self-Signed).
Once certificate setup is complete, the script installs all dependencies, configures IIS, and deploys PowerSyncPro. Installation typically takes 15–30 minutes, depending on server performance. Please note the default login / password when the script completes, be sure to change it!
Post-installation configuration
- Only localhost is allowed administrative access by default.
- The migration agent endpoint (/Agent) remain publicly accessible.
- To allow additional hosts or subnets, use PowerShell:
- Add: C:\Scripts\WebConfig_Editor.ps1 -AddAllowedAddress 10.0.0.0/8
- Remove: C:\Scripts\WebConfig_Editor.ps1 -RemoveAllowedAddress 10.0.0.0/8
- View: C:\Scripts\WebConfig_Editor.ps1
Certificate maintenance
Let’s Encrypt
- Let's Encrypt certificates typically have an expiration timeframe of 90 days after issuance.
- A scheduled task is installed that runs every 7 days.
- When renewal is due, it executes C:\Scripts\Cert-Puller_PoshACME.ps1 to renew the certificate.
Renewing BYOC and existing certificates
When your certificate is due for renewal, run the installation script with -ReverseProxyOnly and select your certificate type from the menu. The script updates the PowerSyncPro configuration, the private-key permissions, and the IIS port 443 binding in one pass.
- BYOC: copy the renewed PFX file to the server, run .\PSP_AutoInstall.ps1 -ReverseProxyOnly, choose BYOC, and supply the new PFX and password. The renewed certificate replaces the old one automatically.
- Existing: install the renewed certificate into the server's certificate store, run .\PSP_AutoInstall.ps1 -ReverseProxyOnly, choose Existing, and select the renewed certificate from the list.
- Note: the default selection is the certificate currently serving HTTPS — during a renewal that is the old certificate, so choose the new one by checking the Expires date shown for each entry.
Components and dependencies
Installed automatically
- Microsoft .NET 8 Hosting Bundle
- Microsoft Visual C++ Redistributables
- Microsoft SQL Server Express (if no existing SQL Server detected)
- Internet Information Services (IIS)
- Web IP features
- Application Request Routing (ARR)
- URL Rewrite
PowerShell modules and tools
- Posh-ACME (for Let’s Encrypt installations)
- Dropped in C:\Scripts for future use:
- WebConfig_Editor.ps1 – manage reverse proxy access
- Cert-Puller_PoshACME.ps1 – automatic certificate management
System configuration
- PowerSyncPro service dependency on SQL startup
- Firewall rules for IIS and PowerSyncPro
- Hosts file updated with PowerSyncPro domain
- Hardened TLS/SSL configuration (legacy ciphers disabled)
Completion
After the installation completes, the script will display:
- PowerSyncPro service status
- Admin login URL
- Certificate validation summary
You can now access your PowerSyncPro instance and begin configuring directories, sync profiles, and migration runbooks.